Fuzzing is a very popular and useful technique used by researchers to find vulnerabilities.
In this article, we are going to describe how we can use AFL++ and Ghidra emulation engine to fuzz programs in embedded devices running on exotic architectures. This could be an alternative choice when it cannot be easily done using a supported emulator engine like Qemu or Unicorn.
In this context, we designed a new tool to interact with AFL++. From this new functionality, we can now implement a code coverage feature while fuzzing through external running program (for example, Ghidra emulation engine).
Finally, we will describe a use case example on a xTensa (ESP32) architecture.
FUZZING
In order to be more efficient in vulnerability discovery, researchers often use a fuzzing approach to highlight potentially exploitable bugs. In a nutshell, fuzzing consists of injecting “random” inputs into a program while monitoring it to detect any abnormal behaviours, like crashes or unexpected issues.
Blind fuzzing
There are many ways to fuzz a target. The first one is called “blind fuzzing”. In many cases, it is the easiest approach which merely consists of sending random data to a program or an embedded device until abnormal behaviour such as a crash, a delayed response or a configuration change occurs and so on.
To be as efficient as possible, “blind fuzzing” requires significant effort in reverse engineering. Indeed, we need to understand the expected input data format of the application in order to maximise the chance of finding vulnerabilities such as the size field, some function code field, CRC and so on. Without this preliminary work, it will be very unlikely to access a potentially vulnerable portion of code.
Fuzzing with code coverage
Nowadays, “Fuzzing with code coverage” is the most relevant fuzzing approach to get interesting results. The main idea is to automatically supply new inputs to the fuzzing engine in order to execute the maximum of reachable code. So, in practice, every new execution path discovered leads to a new sample in which fuzzing mutations will occur. Originally, this approach was only used to fuzz source code because code coverage instrumentation should be added at the time of compilation.
American Fuzzy Lop (AFL)
AFL is one of most popular fuzzing options available. Originally developed by Michal “lcamtuf” Zaleswski, its successor AFL++ is nowadays maintained by a larger community.
AFL is able to fuzz black box programs with code coverage. To reach this goal, AFL depends on emulation engines like Qemu or Unicorn which collects coverage information (basic block address) before delivering it to AFL. For more information, please refer to AFL documentation.
Typically, AFL and Unicorn are used on bare metal embedded devices. First and foremost, Unicorn is aimed to design instrumentation at emulation level, so it becomes easier to develop it (for example, hardware behaviour). For more information about AFL-Unicorn please refer to this article.
Unfortunately, Unicorn is still based on an old Qemu version and it currently supports a limited set of CPU architectures (ARM, ARM64 (ARMv8), M68K, MIPS, SPARC, and X86). So, how can we fuzz program using AFL on an unsupported architecture CPU?
GHIDRA Emulator
Ghidra is an opensource Software Reverse Engineering set of tools originally developed by the NSA which has a number of capabilities such as:
- Disassembly;
- Decompilation;
- Scripting in Java or Python;
- Emulation;
Ghidra supports many CPU architectures, but it also makes the adding of new CPU architecture easier for developers. In a nutshell, if you want to add a new one, you just have to describe the related semantics and how to decode these instructions. Then, you have all of the Ghidra capabilities for your newly supported architecture such as disassembly, decompilation and emulation.
You can find many tutorials available on how to add CPU architecture.
AFL with Ghidra emulator
In order to fuzz some piece of code from an “exotic” architecture, we are relying on AFL++, and on Ghidra to emulate its execution. We must implement the following functionality to profit code coverage benefits:
- A bridge between AFL++ and Ghidra emulator (afl_bridge_external);
- A Ghidra emulation instrumentation (afl_ghidra_emu) which allows to receive input samples, and notify AFL++ about execution path;
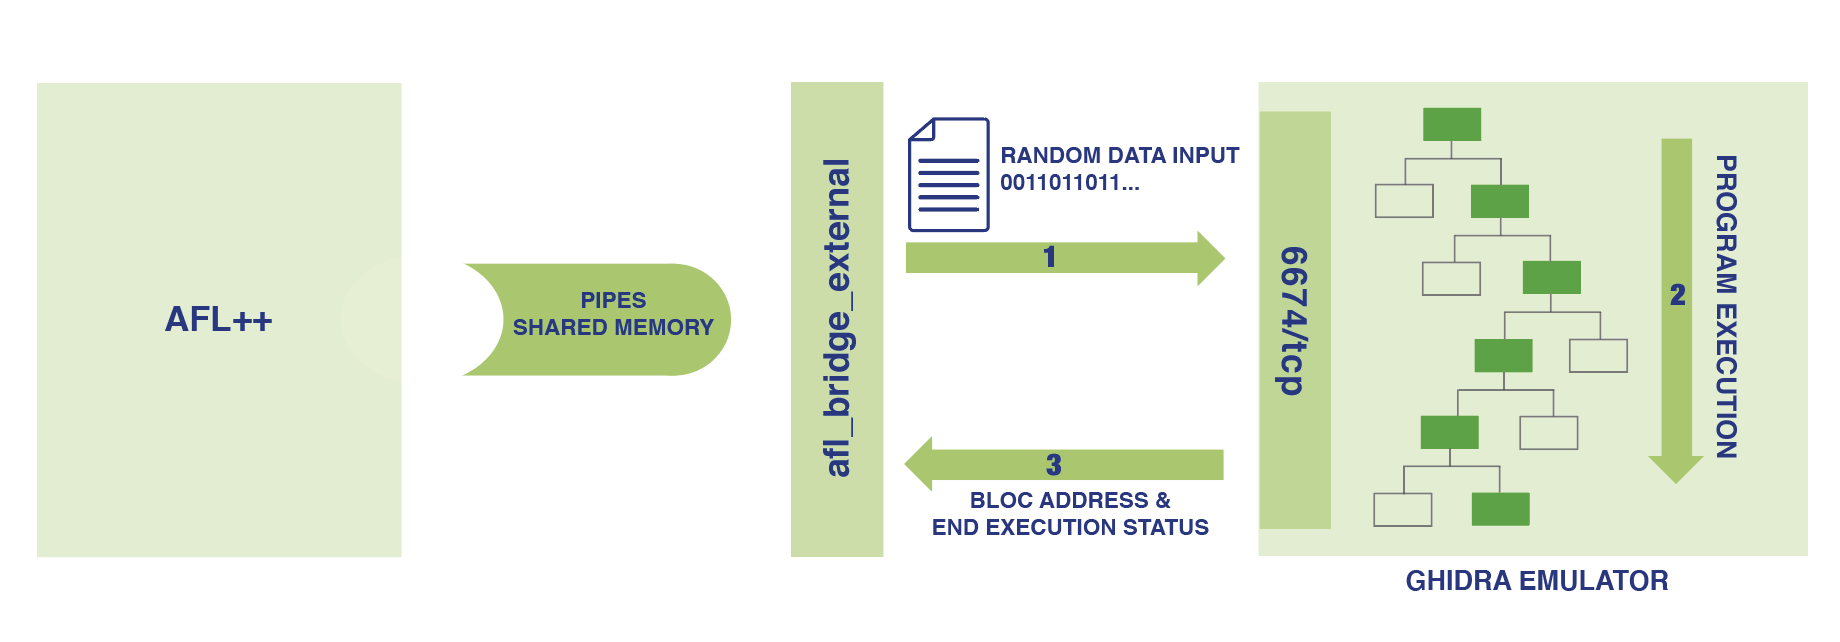
Figure 1: AFL Ghidra emulator PoC architecture
All the code described can be retrieved from our github: afl_ghidra_emu
How it works
AFL++ runs a trampoline program (afl_bridge_external) which is in charge of forwarding samples to Ghidra emulation via a TCP socket (Ex: 127.0.0.1:6674/tcp)
A python script in Ghidra (fuzz_xtensa_check_serial.py) is responsible for emulating code execution. It listens to a TCP socket (127.0.0.1:6674/tcp) and waits for input data coming from trampoline script.
As soon as the script receives input data, the emulation will be started. During the execution, the executed path addresses and the execution status are sent to afl_bridge_external using established TCP socket.
afl_bridge_external reports the execution status and execution path to AFL++ using pipes and shared memory.
Installation
Install [AFL++]
Clone afl_ghidra_emu directory
git clone https://github.com/airbus-cyber/afl_ghidra_emu.git
Compile afl_bridge_external
cd afl_ghidra_emu/afl_bridge_external
make
Copy afl_ghidra_emu files to your ghidra script directory
cd ../..
cp –r afl_ghidra_emu/* $USER_HOME/ghidra_scripts/
Example: Fuzzing Xtensa binary code
As an example, we made a keygenMe software compile for Xtensa architecture that you can download from this link.
Xtensa is not officially supported in Ghidra yet. So, you need first to install it by following these instruction
Load in Ghidra
- Create a new project in Ghidra;
- Import file ./bin/keygenme_xtensa.elf (arch: Xtensa:LE:32);
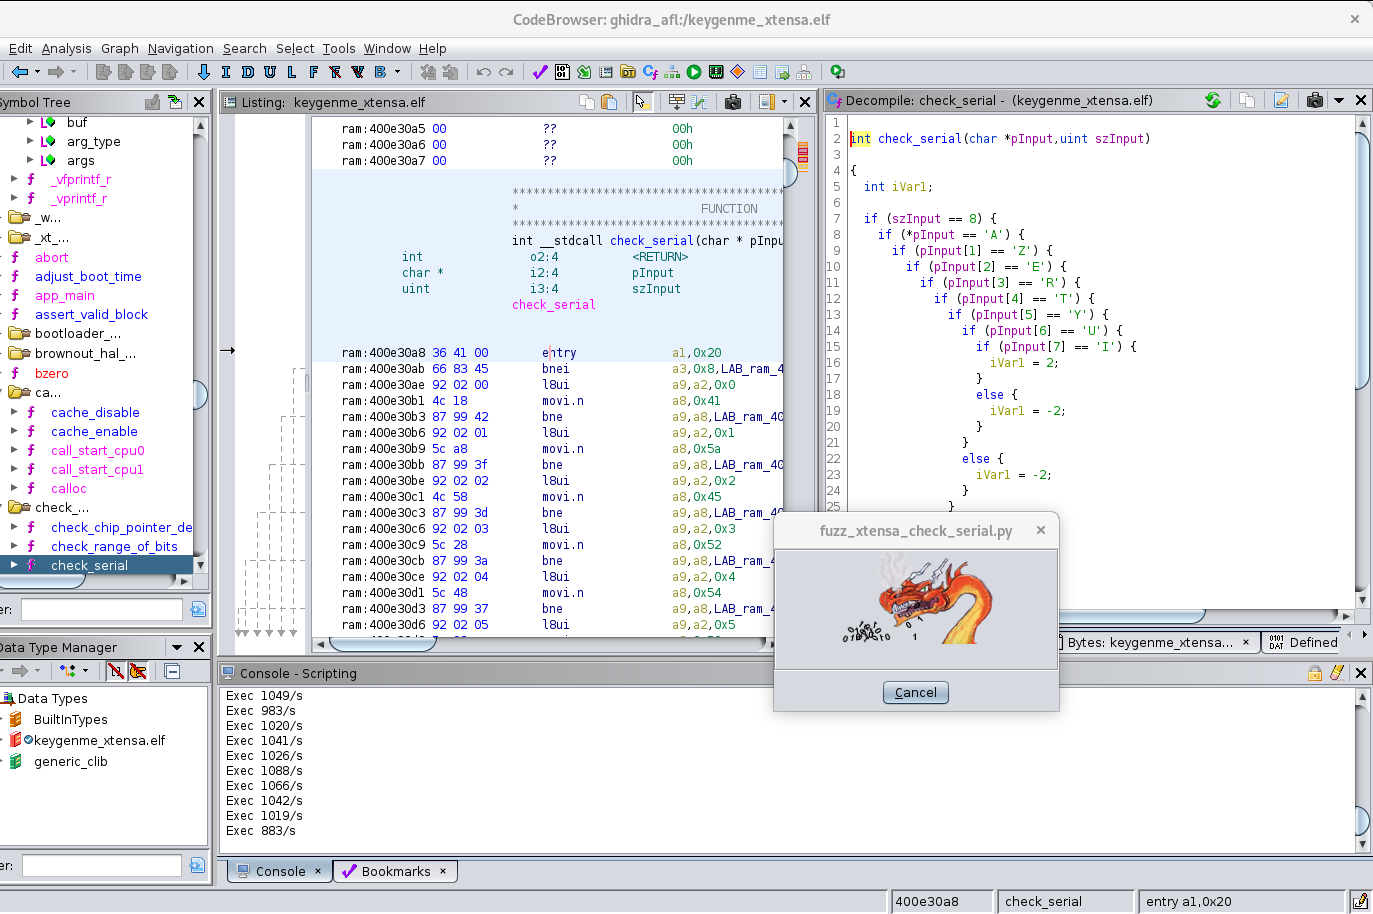
- Open it in CodeBrowser and execute auto-analyze;
- Open Script Manager in “Window” submenu;
- Run script fuzz_xtensa_check_serial.py;
Start Fuzz
Make AFL workspace directories
mkdir input output
Add first sample
echo –n “BBBBBBBB” > input/sample1.bin
Start AFL++ with the trampoline program.
afl-fuzz -D -i input -o output afl_bridge_external 127.0.0.1 6674 20
When AFL++ has detected a crash, we got the expected serial:
cat output/default/crashes/id*
➔AZERTYUI
Stop Ghidra emulation
Stop AFL++ using CTRL+C. If Ghidra emulation is still running, we can send “STOP” command:
echo -e "\xff" | nc 127.0.0.1 6674
Do not use the Ghidra Cancel button, because it does not properly close the socket.
Conclusion
As described in this article, we are able to fuzz a targeted program with code coverage for all architectures supported in Ghidra.
Performances are poor, but we can get better results by launching several instances of fuzzing at the same time. Additionally, lots of instrumentation work still needs to be carried out for improving bug detection (Ex: “ASAN-like” mechanisms).
Please note that our trampoline program (afl_bridge_external) allowed us to “plug” it with other emulation engines or debuggers. Nevertheless, if you want to “plug” it, for example, with a GDB debugger, you still have to design all the necessary instrumentations to notify AFL about the execution path.